Install Degust Explorer on an SD card
To run a Degust Explorer (the actual probe) on a single-board computer such as the Raspberry PI or similar, you need to install our prepared OS image.
Quickstart
This is the list of tasks to run an Explorer:
- use the Degust cockpit to configure a deployable OS image for your Explorer
- download the image to your local disk (provided as a zip file)
- unpack the zip file to a location of your choice
- copy the image onto an SD card using an imagiging tool e.g. balenaEtcher
- insert the SD card into the SBC (e.g. the Raspberry PI)
- power up the SBC
- switch the Degust cockpit to the project you’ve assigned the Explorer to
- watch testing and results in the dashboard
Some notes upfront
If you are new to Degust Explorers, you will most likely see the Acctopus Degust Demo project. This project runs real tests and shows you the results on the dashboard of this project. You can view everything in the demo project, but you cannot make any changes.
As soon as you start installing and activating your own explorers, they will be activated in your own projects, start testing there and also have their own dashboard. You switch to another project by clicking on the project name in the top right corner (1) of the cockpit. You will then get a selection of existing projects (2) you can switch to.

Step 1: Configure and Download the Degust Explorer OS Image
Configure and download the OS Image from within the Degust Cockpit. You will find the link to your OS image on the demo dashboard or in the “Administration”/”Explorers” menu. This opens a list of currently configured Explorers and should also reveal a button named “GET EXPLORER”.
Click on this button to open a new dialog to configure your new Degust Explorer image.
Degust Explorer Images are now personalized to your Organization. You can install as manySBCs using the same Explorer OS image. The Image will give all Explorers system-wide unique names and IDs. Anyway, you may want to create more Explorer images with other or new configuration options.

The Options are described as follows:
Project name to assign Explorers using this image
An Explorer will be assigned to your organization exclusively. To start with an Explorer it offers to be assigned to tests in an initial project. You may give this project a name or chose an available project from the list.
Should this process create initial tests for you?
If you like to get this initial project and some tests created, keep the next checkbox checked.
Tags offer a grouping and selection of Explorers
You can define Tags to group Explorers. These Tags will become handy to tell Degust to run a certain test on all Explores having a certain tag, like ‘all Europe’. This would start a test on all Explorers you have placed all over Europe. Kidding? No! Some of our customer are starting several thousands of tests at once.
Tags may also depict a tariff type, a location like ‘loc=Munich’ or technology like ‘5G’ or ‘FTTH’, and they are additionally used for statistics and in the time series databases where you may report issues from.
Hostname
All Explorers will get a unique hostname. Nevertheless, we learned to give you some flexibility here, so you may prefix the hostname with 3 letters. If you need another name, you may assign an Alias to each of the Explorers in the cockpit after installation.
After configuring the values (or you may leave the defaults untouched) please click on DOWNLOAD.
Next, the Image will be created for you, packed as ZIP file, and then downloaded onto your current system.
Please unpack the image file to the location of your choice.
Step 2: Copy the Image onto an SD Card
To run the downloaded image on a SBCi, you need to copy the image to an SD card. If your SBC supports MMC, follow the instructions of the vendor to install the image.
It is your choice, which tool you will use.
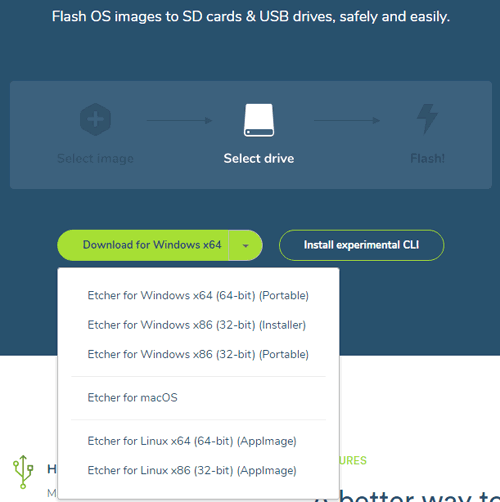
balenaEtcher is a free and open-source utility used for 'burning' image files such as .iso, .img files and zipped folders to create live SD cards and USB flash drives. Etcher completes the whole process of flashing an OS image file into three simple steps: Select Image, Select Drive, and Flash Image.
You can download Etcher from its official website. It will automatically detect your operating system or you can choose it manually.
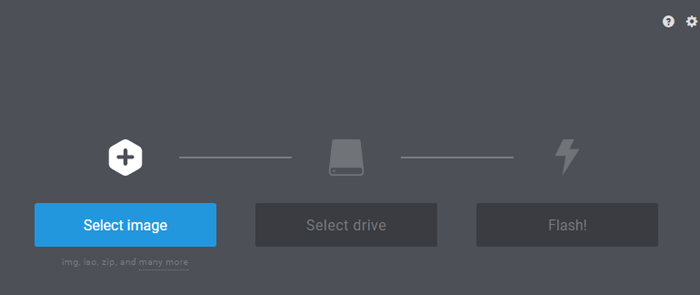
Etcher installs the operating system in three steps, so the first step is to select an image. To select an image file click on Select Image in Etcher. Use the file manager window and locate the image you unzipped in the previous step. Click Open and then the image will appear under Select Image.
Now attach your SD card to the computer using SD card reader. Etcher will detect it automatically. Etcher won’t write to your hard drives by default. Now click Flash to write the image file to the SD card.
Etcher will format the SD card, before writing and verifying the image; this is indicated by a progress bar. After completing this process, remove your SD card from your laptop and insert it into your Raspberry Pi, and power it up.
The Explorer will boot and register to Degust. Shortly after it will start testing.
Please give the Explorer some 5 to 10 minutes to check the world. Some graphs will need some metrics to show meaningful lines.
And please remember to switch to your project, as explained in the notes at the top of this instructions.
Related Articles
Create and install a new Degust Explorer image
The Degust Explorer runs automated tests and monitoring tasks from a single board computer, a Docker image or a Virtual Machine. Single board computers (SBC) could be a Raspberry Pi or some of its alternatives. To download the most current version of ...What is the purpose of the Degust Explorer Heartbeat?
Degust Explorer is a unique endpoint device to simulate online user tasks and tests. The Explorer is located at the edge of the network, receives the commands and test sets from the Degust Cloud Systems for execution, and delivers the test results ...Speed up Test Design using Degust Step Stencils
Coming Soon Building up a test requires the configuration of one or many steps. One would always use the same sequence of steps to achieve similar tasks. Here the "Degust Step Stencils" can help to speed up test design and configuration. About ...Processing order of Tests and Test Steps
Degust works with tests and test steps. Degust can run thousands of tests in parallel, all running side by side or exchanging information with each other to create an overall picture. Unlike all known test programs, however, Degust ensures that no ...Get transparent database access to your test results
Unlocking Potential: How Access to Our Test Database Empowers You Degust monitors your network and tests every aspect of your production chain - continuously. Degust provides a cutting edge dashboard and certain functionality for alarming and for ...